Corn Chivda (Indian Snacks)
Recipe by Kamaths Veg & Non-Veg
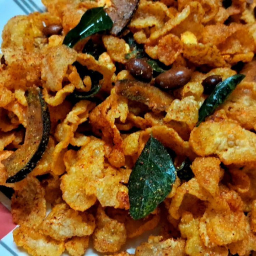
Ingredients
Main Ingredients
- 150 gramsCorn Flakes (raw)
- a few slicesSliced Copra of Coconut
- 1/2 cupPutani (Roasted Gram)
- someCurry Leaves
- 1/2 cupGround Nuts (Peanuts)
- 1-2, choppedGreen Chillies
- for deep fryingOil
Spices and Seasoning
- 1/2 tspTurmeric Powder
- 1/2 tspChaat Masala
- 1/4 tspHing (Asafoetida)
- 1.5 tspCoriander Powder (roasted)
- 1 tspJeera Powder (roasted)
- 4-5 tspRed Chilli Powder (roasted)
- 2-3 tsp (optional)Sugar Powder
- to tasteSalt
Step-by-Step Instructions
- 1.Prepare for Frying
Heat oil in a kadai (wok) over high flame. Ensure the oil is hot enough for deep frying.
- 2.Fry Corn Flakes
Using a frying strainer, add small batches of raw corn flakes to the hot oil. Fry until they puff up and become crispy and golden. Remove from oil and place in a large mixing bowl or kadai. Repeat for all corn flakes.
- 3.Fry Ground Nuts (Peanuts)
In the same hot oil, add the ground nuts (peanuts) to the frying strainer. Fry until they turn reddish-brown and are crispy. Remove from oil and add to the bowl with corn flakes.
- 4.Fry Sliced Copra
Add the sliced copra of coconut to the hot oil using the strainer. Fry until they turn golden brown and crispy. Remove from oil and add to the mixing bowl.
- 5.Fry Putani (Roasted Gram)
Briefly fry the putani (roasted gram) in the hot oil until slightly crispy. Since they are already roasted, they don't need much frying. Remove and add to the mixing bowl.
- 6.Fry Green Chillies and Curry Leaves
Fry the chopped green chilies and curry leaves in the remaining hot oil until they become crispy. Remove and add to the mixing bowl.
- 7.Combine and Season
To the large bowl containing the fried corn flakes, ground nuts, copra, putani, green chilies, and curry leaves, add the red chili powder, turmeric powder, chaat masala, hing, roasted coriander powder, roasted jeera powder, sugar powder (if using), and salt to taste. Mix all the ingredients thoroughly using a large spoon or spatula, ensuring the spices are evenly distributed.
- 8.Serve and Store
Once all ingredients are well mixed and coated with spices, the Corn Chivda is ready to serve. Enjoy this crispy and flavorful snack. Store any leftovers in an airtight container to maintain freshness and crunch.


Comments (0)
Sign in to leave a comment on this recipe.
Loading comments...