Fullmeals
HomeExploreCreatorsPantry MatchSurprise Me
HomeExploreCreatorsPantry MatchSurprise MeShopping ListMy Favorites
Fullmeals

Fullmeals helps you cook without watching by converting cooking videos into simple, step-by-step recipes designed for real kitchens.

cook@fullmeals.com

Quick Links

  • How it Works
  • Categories
  • Explore Recipes
  • RSS Feed

Legal

  • Terms of Use
  • Privacy Policy

© 2026 Fullmeals. All rights reserved.

Fullmeals

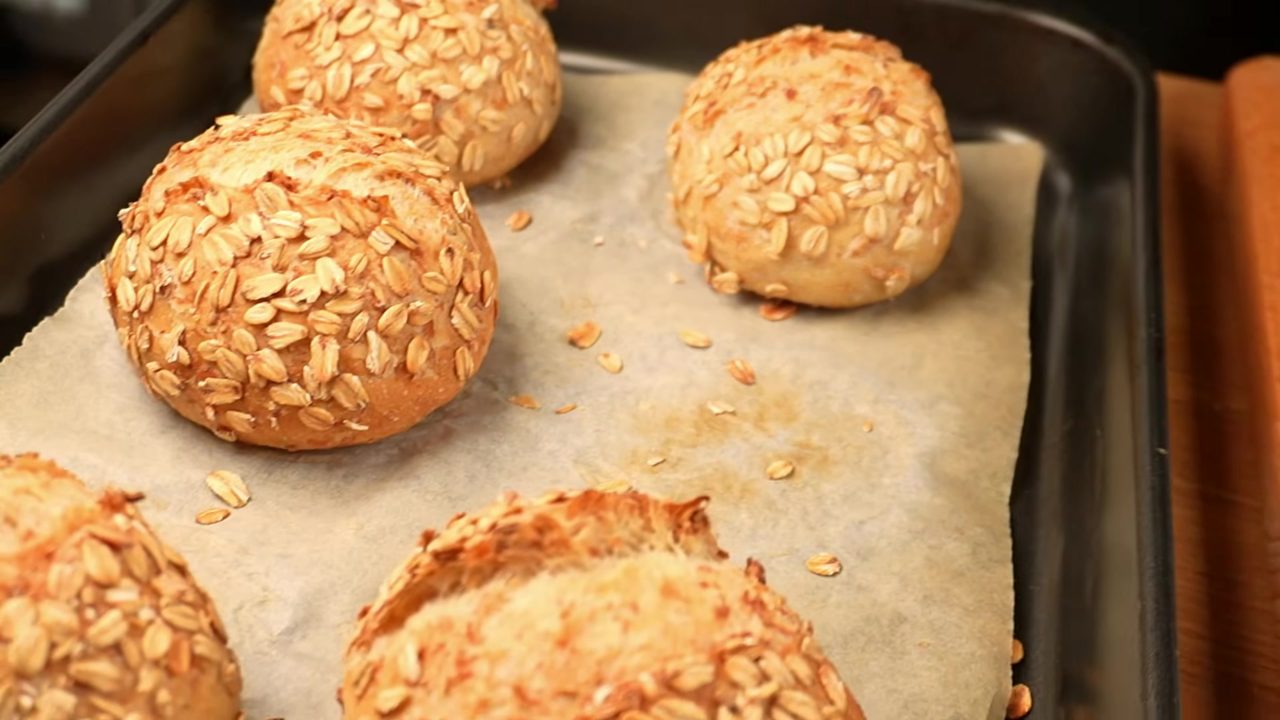
Oat Bread Rolls - No Knead

Recipe by Food Heaven
  • Ready in280 min
  • Prep15 min
  • Cook30 min
  • CuisineEuropean · Western
  • Serves6 People
  • Calories~250 kcal
Oat Bread Rolls - No Knead

Ingredients

Main Ingredients

  • 1 cup (80 g)Rolled oats
  • 1 cup (230 ml)Water (for oats)
  • 3 ½ tbsp (50 ml)Water (for starter)
  • 1 tsp (3 g)Fresh yeast
  • ½ tsp (2 g)Dry yeast
  • 1 tspSugar (optional)
  • 2 ½ cups (310 g)Bread flour
  • 1 ½ tsp (9 g)Salt

Step-by-Step Instructions

  1. 1.Soak Oats

    Pour 1 cup (80 g) of rolled oats into a bowl, add 1 cup (230 ml) of water, mix well, and set aside to soak.

  2. 2.Prepare Yeast Starter

    In a separate bowl, add 3 ½ tbsp (50 ml) of water, 1 tsp (3 g) of fresh yeast (or ½ tsp (2 g) of dry yeast), and 1 tsp (optional) of sugar. Mix quickly until the yeast and sugar are dissolved.

  3. 3.Add Flour to Starter

    Add ½ cup (60 g) of bread flour to the yeast mixture and mix with a wooden spoon until a rough, shaggy dough forms. There's no need to knead at this stage.

  4. 4.First Rise (Starter)

    Cover the starter bowl with plastic wrap and let it rise at room temperature for 20 minutes. The starter should become very active and bubbly, indicating the yeast is working.

  5. 5.Combine Oats and Starter

    Add the previously soaked oats (including any remaining water) to the active starter mixture. Mix quickly with the wooden spoon to combine the ingredients.

  6. 6.Add Remaining Flour and Salt

    Add the remaining 2 cups (250 g) of bread flour and 1 ½ tsp (9 g) of salt to the bowl. Mix until there is no more dry flour visible. Just mix, no need to knead the dough.

  7. 7.Second Rise

    Cover the dough with plastic wrap and let it rise at room temperature for 30 minutes.

  8. 8.First Stretch and Fold

    With a wet hand (dip your hand in water to prevent sticking), gently stretch one side of the dough up and fold it towards the center. Repeat this process for all four sides of the dough. This technique is called 'lift and slap'.

  9. 9.Rest

    Cover the dough again with plastic wrap and let it rest for another 30 minutes.

  10. 10.Second Stretch and Fold

    Repeat the stretch and fold technique from before, stretching and folding all four sides of the dough towards the center. Finish by lifting the dough from the center and slapping it back into the bowl to develop gluten.

  11. 11.Final Bulk Rise

    Cover the dough and let it rise for 2 hours, or until it has doubled in size. This can be done at room temperature or in a slightly warm place.

  12. 12.Prepare for Shaping

    Sprinkle a generous amount of flour on your clean work surface. Gently scrape the risen dough out of the bowl onto the floured surface. Fold the dough once or twice to make it easier to handle and cut.

  13. 13.Divide Dough

    Using a dough scraper or knife, cut the dough into 6 equal parts. These will be your individual bread rolls.

  14. 14.Shape Rolls

    Take each piece of dough and gently roll it into a tight ball. To seal the bottom and create surface tension, rub the dough ball against the work surface in a circular motion.

  15. 15.Coat with Oats

    Brush each dough ball with water using a pastry brush. Then, press the top of each roll into a plate of rolled oats, ensuring it's well coated. Place the coated rolls on a baking tray lined with parchment paper, leaving some space between them.

  16. 16.Final Proofing

    Cover the baking tray with a clean kitchen towel and let the rolls rise for an additional 30 minutes.

  17. 17.Score and Hydrate

    Once proofed, use a sharp blade or knife to score the top of each bread roll. This helps with expansion during baking. Lightly splash the rolls with water before baking.

  18. 18.First Bake (Covered)

    Cover the baking tray with another inverted baking tray (or a roasting pan) to trap steam. Bake in a preheated oven at 430°F (220°C) for 20 minutes.

  19. 19.Second Bake (Uncovered)

    After 20 minutes, carefully remove the top tray. Continue baking the rolls for an additional 10 minutes, or until they are golden brown and have a crispy crust.

  20. 20.Serve

    Remove the baked oat bread rolls from the oven. Let them cool slightly before serving. They are perfect with butter or your favorite spread.

Printed from Fullmeals.com — turn any cooking video into a recipe.

Oat Bread Rolls - No Knead

Ready in

280 mins

Cuisine

European · Western

Prep Time

15 min

Cook Time

30 min

Serving

6 People

Calories / Serving

~250 kcal
Recipe by Food Heaven on YouTube
Adjust Servings
Measurements
Tap an ingredient to mark it ready0 of 8 ready
All Ingredients

Main Ingredients

Step-by-Step Instructions

Follow each step to make the recipe successfully.

  1. 1

    Soak Oats

    Pour 1 cup (80 g) of rolled oats into a bowl, add 1 cup (230 ml) of water, mix well, and set aside to soak.

  2. 2

    Prepare Yeast Starter

    In a separate bowl, add 3 ½ tbsp (50 ml) of water, 1 tsp (3 g) of fresh yeast (or ½ tsp (2 g) of dry yeast), and 1 tsp (optional) of sugar. Mix quickly until the yeast and sugar are dissolved.

  3. 3

    Add Flour to Starter

    Add ½ cup (60 g) of bread flour to the yeast mixture and mix with a wooden spoon until a rough, shaggy dough forms. There's no need to at this stage.

  4. 4

    First Rise (Starter)

    Cover the starter bowl with plastic wrap and let it rise at room temperature for . The starter should become very active and bubbly, indicating the yeast is working.

  5. 5

    Combine Oats and Starter

    Add the previously soaked oats (including any remaining water) to the active starter mixture. Mix quickly with the wooden spoon to combine the ingredients.

  6. 6

    Add Remaining Flour and Salt

    Add the remaining 2 cups (250 g) of bread flour and 1 ½ tsp (9 g) of salt to the bowl. Mix until there is no more dry flour visible. Just mix, no need to the dough.

  7. 7

    Second Rise

    Cover the dough with plastic wrap and let it rise at room temperature for .

  8. 8

    First Stretch and Fold

    With a wet hand (dip your hand in water to prevent sticking), gently stretch one side of the dough up and fold it towards the center. Repeat this process for all four sides of the dough. This technique is called 'lift and slap'.

  9. 9

    Rest

    Cover the dough again with plastic wrap and for another .

  10. 10

    Second Stretch and Fold

    Repeat the stretch and fold technique from before, stretching and folding all four sides of the dough towards the center. Finish by lifting the dough from the center and slapping it back into the bowl to develop gluten.

  11. 11

    Final Bulk Rise

    Cover the dough and let it rise for , or until it has doubled in size. This can be done at room temperature or in a slightly warm place.

  12. 12

    Prepare for Shaping

    Sprinkle a generous amount of flour on your clean work surface. Gently scrape the risen dough out of the bowl onto the floured surface. Fold the dough once or twice to make it easier to handle and cut.

  13. 13

    Divide Dough

    Using a dough scraper or knife, cut the dough into 6 equal parts. These will be your individual bread rolls.

  14. 14

    Shape Rolls

    Take each piece of dough and gently roll it into a tight ball. To seal the bottom and create surface tension, rub the dough ball against the work surface in a circular motion.

  15. 15

    Coat with Oats

    Brush each dough ball with water using a pastry brush. Then, press the top of each roll into a plate of rolled oats, ensuring it's well coated. Place the coated rolls on a baking tray lined with parchment paper, leaving some space between them.

  16. 16

    Final Proofing

    Cover the baking tray with a clean kitchen towel and let the rolls rise for an additional .

  17. 17

    Score and Hydrate

    Once proofed, use a sharp blade or knife to top of each bread roll. This helps with expansion during baking. Lightly splash the rolls with water before baking.

  18. 18

    First Bake (Covered)

    Cover the baking tray with another inverted baking tray (or a roasting pan) to trap . Bake in a preheated oven at 430°F (≈220°C) (approximately 220°C) (220°C (≈430°F) (approximately 430°F)) for .

  19. 19

    Second Bake (Uncovered)

    After , carefully remove the top tray. Continue baking the rolls for an additional , or until they are golden brown and have a crispy crust.

  20. 20

    Serve

    Remove the baked oat bread rolls from the oven. Let them cool slightly before serving. They are perfect with butter or your favorite spread.
Before You Cook

Helpful details before you start
AllergensThis recipe contains gluten.
gluten

Plan Ahead

Complete this step earlier to save time later.

  • Step7
    Second Rise30 minutes

    Cover the dough with plastic wrap and let it rise at room temperature for 30 minutes.

    View Step 7
  • Step9
    Rest30 minutes

    Cover the dough again with plastic wrap and let it rest for another 30 minutes.

    View Step 9
  • Step11
    Final Bulk Rise2 hours

    Cover the dough and let it rise for 2 hours, or until it has doubled in size. This can be done at room temperature or in a slightly warm place.

    View Step 11

Variations

Simple ways to adapt this recipe.

  • 1
    Add seeds like flaxCustomise

    Chia, or sunflower to the dough for extra texture and nutrition.

  • 2
    Experiment with different flours

    Such as whole wheat or spelt, for varied flavors and textures.

  • 3
    For a sweeter rollCustomise

    Increase the sugar content or add a drizzle of honey after baking.

Helpful Tips

Small details that can improve the final result.

  • 1
    Ingredient noteEnsure Your Yeast Is Fresh

    Ensure your yeast is fresh and active for proper rising.

  • 2
    Cooking tipUsing a Wet Hand for

    Using a wet hand for stretching and folding prevents the dough from sticking.

  • 3
    TipCovering the Rolls with Another

    Covering the rolls with another tray during the initial bake creates steam, resulting in a crispier crust.

Was this recipe helpful?

Comments (0)

Sign in to leave a comment on this recipe.

Loading comments...

You might also like

Other recipes in the same cuisine, meal type, or style — ready to cook whenever you are.

Chocolate Muffins – Easy Recipe

Chocolate Muffins – Easy Recipe

Cuisine

European · Baking

Prep + Cook Time

40 Minutes

Difficulty Level

Easy

Crispy Wheat Grain Bread

Crispy Wheat Grain Bread

Cuisine

European

Prep + Cook Time

4 hr 25 min

Difficulty Level

Medium

Easy No-Knead Bread – Fluffy & Crusty

Easy No-Knead Bread – Fluffy & Crusty

Cuisine

European · Bakery

Prep + Cook Time

2 hr 45 min

Difficulty Level

Easy

Cheesy Garlic Bread Rolls

Cheesy Garlic Bread Rolls

Cuisine

European

Prep + Cook Time

2 hr 5 min

Difficulty Level

Medium

Hot Cross Buns – Soft and Fluffy

Hot Cross Buns – Soft and Fluffy

Cuisine

European · Western Bakery

Prep + Cook Time

3 hr 27 min

Difficulty Level

Medium

Sauerteigbrot für Berufstätige – Minimaler Aufwand

Sauerteigbrot für Berufstätige – Minimaler Aufwand

Cuisine

European · German/Swiss

Prep + Cook Time

1 hr 10 min

Difficulty Level

Medium