Homemade Paneer - Indian Style
Summary
- Learn how to make fresh, soft paneer at home from scratch. This recipe guides you through the process of curdling milk, draining the whey, and pressing the cheese to create a firm block of paneer, perfect for various Indian dishes.
All Ingredients - Main Ingredients
- Milk (full-fat recommended) 1 liter
- Lemon juice (optional, if using normal milk) 1-2 tablespoons
Tools You'll Need
- Pan
- Pot
- Cheesecloth
- Mixing bowl
- Colander
- Bowl
- Mortar & pestle
Don't have an ingredient? Try these swaps
No Milk?
- Unsweetened almond / soy / oat milk (1:1)
- 1/2 cup evaporated milk + 1/2 cup water (per 1 cup)
No Lemon juice?
- Lime juice (1:1)
- 1/2 the amount white vinegar — In dressings, savory dishes.
⚠ Contains Allergens
Step-by-Step Instructions
Step 1: Boil the Milk
Pour the milk into a heavy-bottomed pan and place it on a medium flame. Bring the milk to a good boil. If using naturally soured milk, it will start to curdle on its own as it heats up.
Step 2: Curdle the Milk
If using normal milk, once it comes to a good boil, add 1 or 2 tablespoons of lemon juice. Stir gently. The milk will start to curdle, separating into solids (paneer) and greenish liquid (whey). Once the milk is completely curdled and greenish whey is visible, turn off the flame.
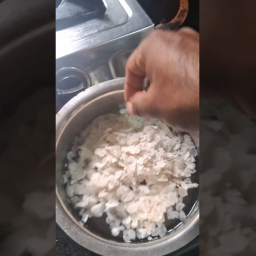
Step 3: Strain the Curdled Milk
Place a muslin cloth or cheesecloth over a large bowl or colander. Carefully pour the curdled milk into the muslin cloth. The solids will remain in the cloth, and the whey will collect in the bowl below. You can reserve the whey for other culinary uses.
Step 4: Rinse the Paneer
Rinse the paneer (solids in the muslin cloth) under cold running water for a minute or two. This helps to wash away any residual sour taste from the lemon juice.
Step 5: Drain Excess Water
Gather the edges of the muslin cloth and gently squeeze out the excess water from the paneer. Be careful not to squeeze too hard, as it might make the paneer dry.
Step 6: Press the Paneer
Place the wrapped paneer in a container or on a flat surface. Put a heavy weight on top of it (like a heavy pot or a mortar and pestle) to press out the remaining water and shape the paneer. Leave it to press for at least .
Step 7: Serve or Store
After an hour, unwrap the paneer. It should be a firm block. You can use it immediately in your favorite recipes or refrigerate it in an airtight container for future use. It stays fresh for 2-3 days in the refrigerator.
Pro Tips
• If using normal milk, add lemon juice or vinegar to curdle it. If using naturally soured milk, it will curdle on its own.
• Rinsing the curdled milk under cold water helps remove any sour taste from the lemon juice/vinegar.
• Reserve the greenish whey; it can be used in gravies, kneading dough, or as a healthy drink.
• Ensure sufficient weight is applied during pressing to achieve a firm paneer block.
Storage & Leftovers
How to keep what you don't finish — pulled straight from the recipe.
- Store
You can use it immediately in your favorite recipes or refrigerate it in an airtight container for future use.
- Storeup to 3 days
It stays fresh for 2-3 days in the refrigerator.
You might also like
Other recipes in the same cuisine, meal type, or style — ready to cook whenever you are.
Poha (Flattened Rice) Stir-fry
Cuisine
Indian · South Indian
Prep + Cook Time
20 Minutes
Difficulty Level
Easy

Crispy Bhindi Fry (Okra Stir Fry)
Cuisine
Indian · North Indian
Prep + Cook Time
25 Minutes
Difficulty Level
Easy
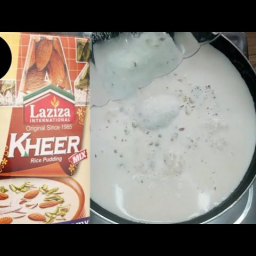
Laziza Kheer Mix Recipe – Traditional
Cuisine
Indian · South Asian
Prep + Cook Time
12 Minutes
Difficulty Level
Easy
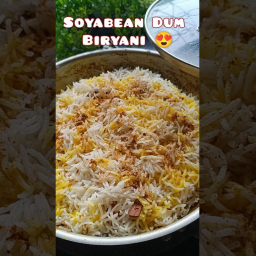
Soyabean Dum Biryani
Cuisine
Indian · North Indian
Prep + Cook Time
1 hr 5 min
Difficulty Level
Medium

Bhel Puri - Street Style
Cuisine
Indian · Street Food
Prep + Cook Time
30 Minutes
Difficulty Level
Easy

Urad Dal Papad Vadi
Cuisine
Indian · Maharashtrian
Prep + Cook Time
40 Minutes
Difficulty Level
Comments
Sign in to leave a comment on this recipe.
Loading comments...